Archive for the ‘Windows FTP’ Category

How to Install Windows 8 on a Mac

Tuesday, May 6th, 2014

Why it is better:

Windows 8 has received some mixed reviews; it remains Microsoft’s latest operating system. If you own a Mac, and you want to use Windows, purchasing Windows 8 is likely the best option for you. Apple does not support Windows 8, so the support drivers you download are for Windows 7. In addition, the drivers for Windows are basic even when fully supported, so don’t expect your experience to take complete advantage of your Mac’s hardware. Free space is needed because Windows 8 will be installed on a partition of your Mac’s hard drive reserved specifically for it.


Tutorial:

Step 1: Download the Windows 8 Release Preview ISO

o Nip over to the Windows 8 Release Preview site and download something Microsoft call the Windows 8 ISO.

Step 2: Run Boot Camp Assistant

o Open the Boot Camp Assistant in the Utilities folder (Cmd+shift+U).

o Check the entire task in the “select Tasks” wizard and then Continue button.

o Click continue to “create Bootable USB Drive for Windows Installation” page.

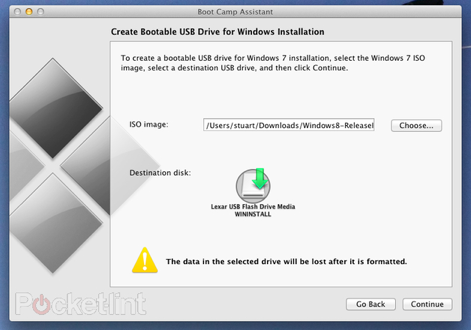
o Select USB drive and Windows 8 ISO then click install button.

Step 3: Installing Windows 8

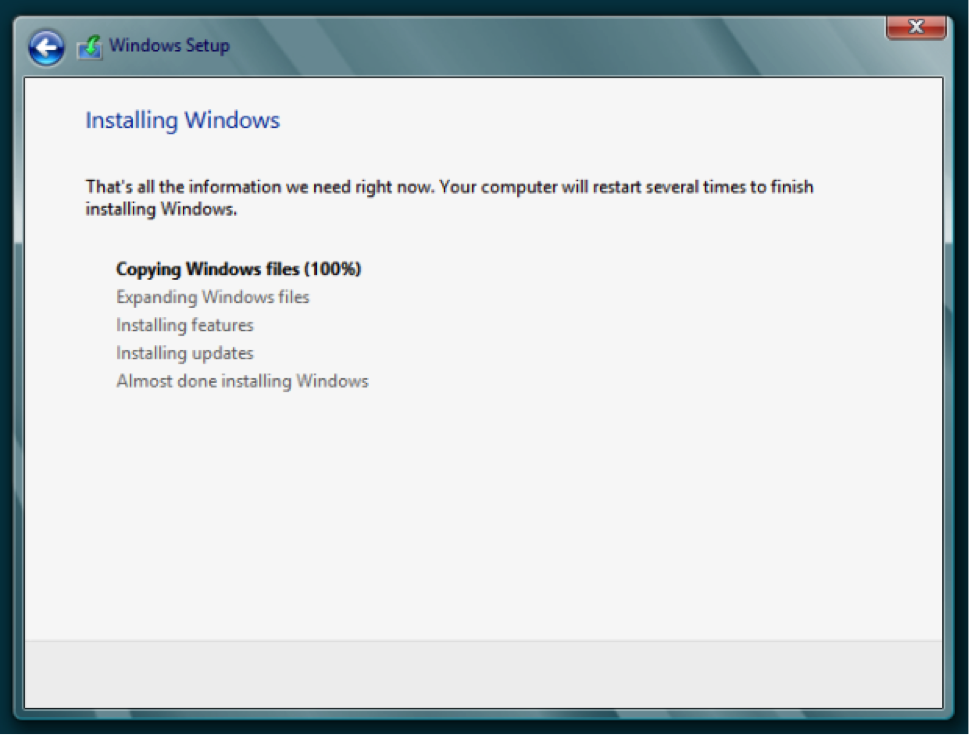
o Restart the Mac and the Windows 8 Install process will begin.
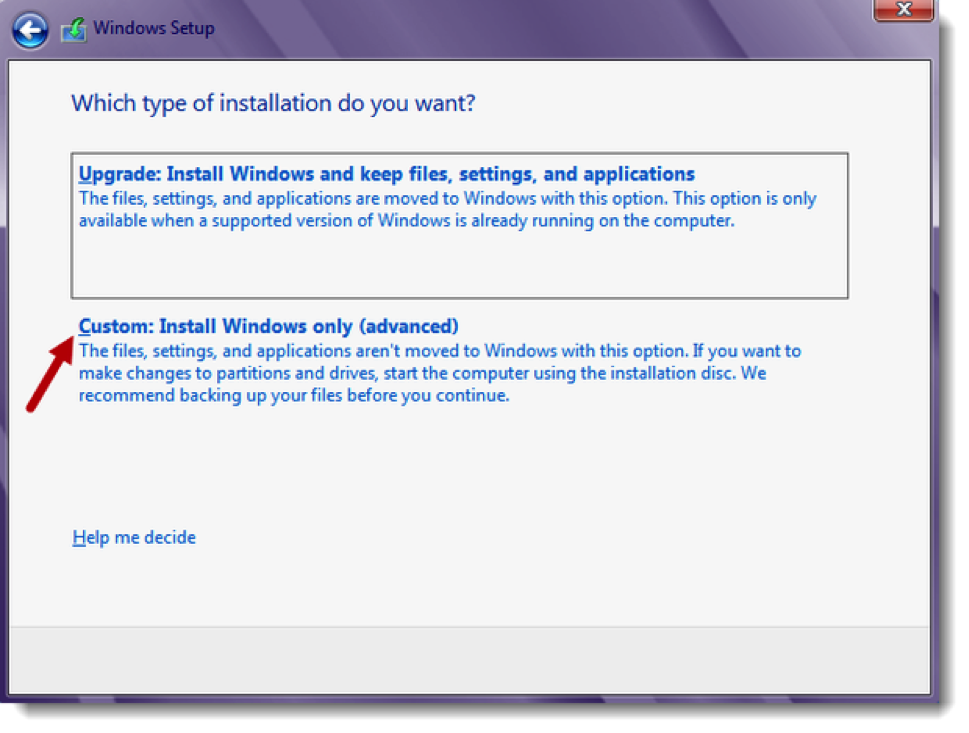
o Select language and choose custom.
o Enter the product code as TK8TP-9JN6P-7X7WW-RFFTV-B7QPF.
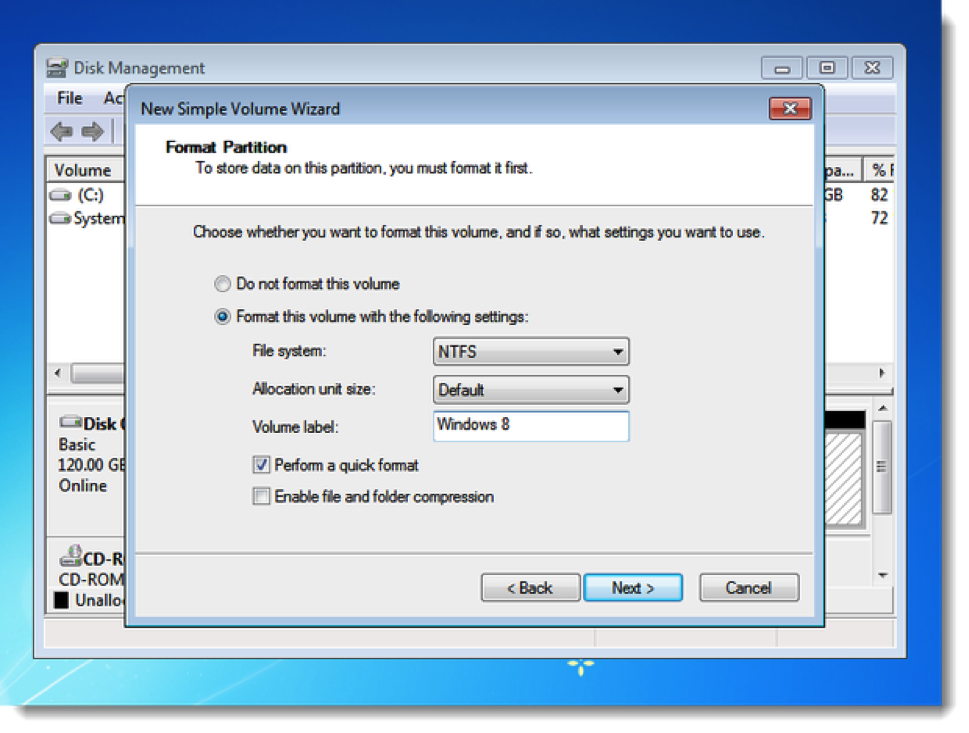
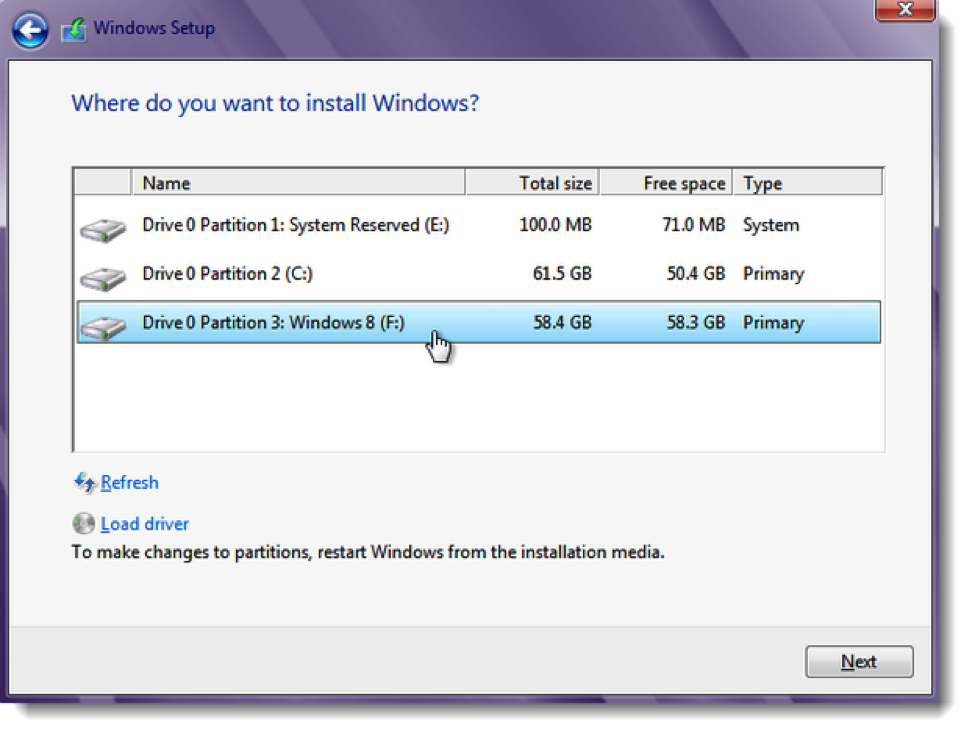
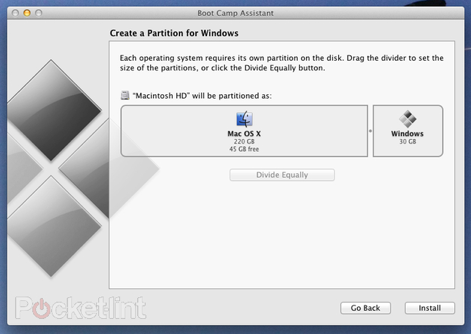
o Select the drive to install Windows 8 on.
o Select the BOOTCAMP partition in the list, click “Drive options (advanced)” and “Format” button.
o Click “Ok” for the prompt.

Step 4: Final tidy up

o Created a Microsoft account and logged on to your Wi-Fi network.
o Start playing.
o Press Cmd+E and select the USB drive from the list of drives.
o Go into the Windows Support folder and run Setup.

It will install the right graphics drivers and support for the trackpad etc. based on your machine.

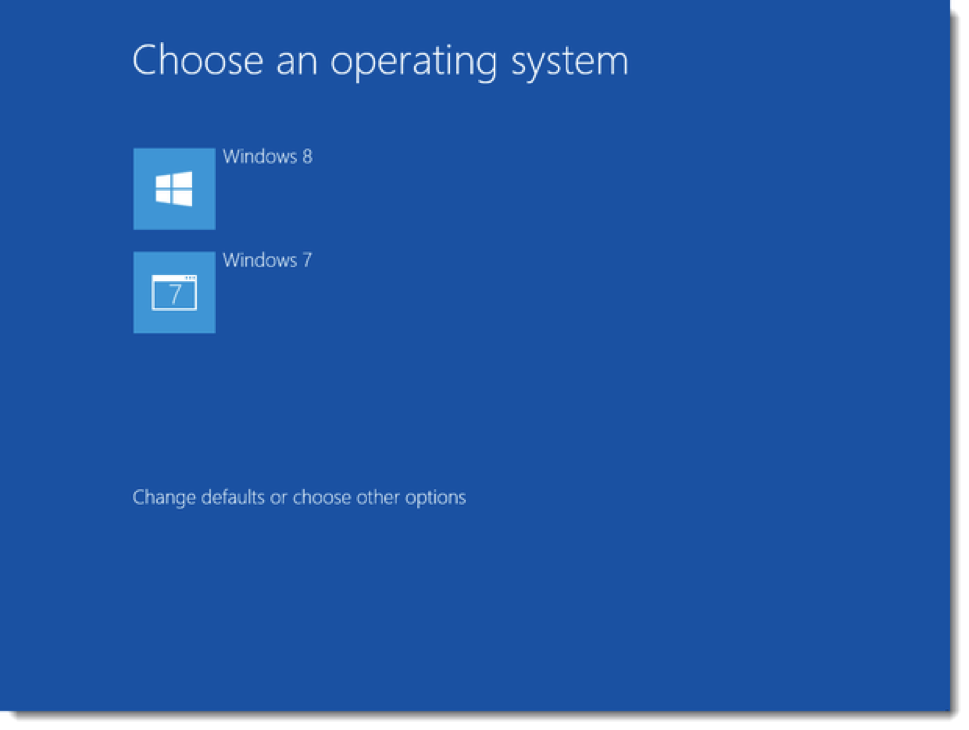
Step 5: Switching between OS X and Windows 8

o Installed Windows 8 on your Mac. Well done.

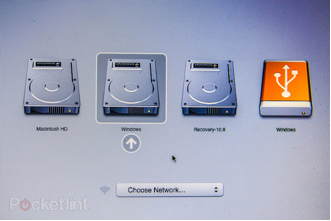
Shut down Windows 8 and restart, press the option key when your Mac reboots. It will give you a choice of drives to boot from leaving you to pick Macintosh HD.

How to Extend the Battery Life of Your Laptop?

Monday, May 5th, 2014

Some tips:

Whether you own a Windows laptop or are running a different operating system, follow these general tips and your laptop will last longer between charges.

Decrease the screen brightness:

Most laptops come with the ability to dim your laptop screen.  Some even come with ways to modify CPU and cooling performance. More the screen brightness, more the battery consumed by your laptop. To decrease it, click on the battery icon on the system tray and select “More power options”.

Power options window will open; move the screen brightness slider to left. Note that working with less screen brightness is also good for your eyes.

Avoid using screensavers:

Screensaver starts playing after some time. It consumes the battery so it is better to turn it off. To change it, right click on your desktop and select Personalize

Now on the bottom right, click on Screen Saver.

Click on Screen Saver drop down and select none. Click OK.

Defrag from time to time:

Defragmentation makes your hard drive more efficient which results in a fast hard drive and hence less battery consumption. To use Windows Disk Defragmenter, click on Start button and type Disk defragmenter in the search box and press Enter key.

Disk defragmenter window will appear. Now click on Configure schedule to schedule the defragmentation process.

Now select the frequency, day, time and a disk from the given drop downs and presses OK.

Remove external USB devices:

USB devices are known to drain the battery. If any USB device like external hard drive, pen drive, mouse, memory card, iPod or iPhone is connected and you are not using it, then remove it.

Add more RAM:

Windows comes with virtual memory feature in which it uses hard disk memory when it runs out of RAM. This feature ultimately results in usage of hard disk and load on laptop battery. To avoid this you should increase your RAM according to your requirement

Optimize the power option:

Power option in Windows has different settings to save battery life. To go to power option, click on battery icon in the system tray and select power option.

Now click on Change power settings.

Here you can decide when your computer will dim the display or when it turns off the display while it is on battery. Also you can decide the time after which it will go to the sleep state. You can also make use of advanced power settings.

On advanced power window you will find many options to optimize your laptop for a better battery life.

Adjust Visual Effects:

Visual effects also consume battery power so it is a good idea to switch it to best performance setting. Types adjust performance and press Enter.

In performance options window, go to Visual Effects tab. Now select the option Adjust for best performance. It will turn off all the effects that enhance the visual performance of your PC.

Keep the battery contacts clean:

Clean your battery’s metal contacts every couple of months with a cloth moistened with rubbing alcohol.  This keeps the transfer of power from your battery more efficient.

Take care of your battery:

Do not leave a charged battery dormant for long periods of time.  Once charged, you should at least use the battery at least once every two to three weeks.

How to Dual Boot Windows 8 and Windows 7

Sunday, May 4th, 2014

Introduction and Tutorial:

If you have a Windows 7 PC but aren’t sure you’re ready to upgrade to Windows 8 yet, a dual-boot system might be a good way to ease into it. This will let you use both operating systems, side-by-side, until you’re comfortable enough with Windows 8 to go all in. To configure your PC for dual-boot, all you have to do is creating a new partition for Windows 8, and then install it.

Since the Windows 8 Developer Preview hit the streets back in September 2011, I’ve written a bunch of articles on the new operating system covering such topics as the improved Windows Explorer, Windows 8 shortcut keys, Storages Spaces, and File History, just to name a few. However, I was recently reminded that there is one topic that I haven’t covered for Windows 8 and that is how to set up a dual boot machine.

Caution: Before you begin, make sure to back up your system. This is a simple procedure, but there’s always a risk of data loss whenever you modify disk partitions. If you have Norton Ghost or Acronis True Image handy, cloning your drive/partition is probably the best way to recover from any problems you might run into.

Step 1: Back Up:

Before you attempt this, however, you should back up your existing Windows PC. You never know what will happen when installing a new OS. At least back up all your photos, videos, and documents. A complete image backup of your hard disk is preferable, however. Windows 7 has a built-in backup feature to secure your data files, but for image backup, you’ll need third-party software such as, our Editors’ Choice.

Step 2: Create new partition in Windows 7:

o In Windows 7, hit the shortcut Win+R, then type “diskmgmt.msc” to start Disk Management.

o To make room for Windows 8, you first need to shrink the C: volume. In Disk Management, right-click on your hard drive and select Shrink Volume, then choose how much space to shrink.

o Once the shrink task has completed right-click on the unallocated partition, then select New Simple Volume. Go through the New Simple Volume Wizard and make sure to format the new partition in NTFS and give it a volume label, like Windows 8.

Step 3: Install Windows 8:

o Insert a bootable Windows 8 DVD or USB flash drive into your PC, and then reboot it to begin Windows 8 installation.

o When prompted to choose the type of installation, choose Custom.

o For the location of your Windows 8 install, select the new partition you created.

o After selecting the new partition on which to install Windows 8 and clicking next, the installation will begin, as below.

Step 4: Dual-booting Windows 7/Windows 8:

Once Windows 8 finishes installing, the boot menu will appear with both Windows 8 and Windows 7. By default, Windows 8 will start automatically after 30 seconds, but you can set Windows 7 as the default by clicking on “Change defaults or choose other options” from the boot menu.

How to Move the WSUS Database to a Different SQL Server

Saturday, May 3rd, 2014

Tutorial:

1. Install SQL Server 2005.

2. Stop the IIS Admin service and the Update Services service.

o Click Start-> Programs-> Administrative Tools->click Services.
o Right-click IIS Admin Service, and then click Stop.
o Right-click Update Services, and then click Stop.

3. Detach the WSUS database from the original SQL server.

o Right-clicking the SUSDB, choosing Task and then choose detach.
o Choose OK in the “Detach Database” wizard Page.
o Choose the “Drop Connections” box.

4. Copy the database files from the old SQL server to the new SQL server. Most of the time these files will be in the MSSQL\Data directory.

5. Attach the database files as SUSDB to the new SQL server.

o Right-click Databases and choose Attach.
o Point to the place where you copied the files
o Choose “OK”.

6. Back on the WSUS server, open the registry editor.

o Click Start-> Run-> Type regedit->click OK.

7. Browse to HKLM \ SOFTWARE \ Microsoft \ UpdateServices \ Server \ Setup \ SqlServerName.

o In the Value box , type [ServerName]\[InstanceName]
o Click OK.

8. Open Services and start the IIS Admin service and Update Services service.

o Click Start-> Programs-> Administrative Tools->click Services.

9. Restart the services IIS Admin, HTTP SSL, WWW Publishing, and the Updates Services.

10. To verify that everything is working run the Update Services Console and give it a moment to connect.

How to Create a CentOS Template for vSphere ESX

Friday, May 2nd, 2014

Tutorial

The Community Enterprise Operating System (CentOS) is a freely available Linux distribution that is fully binary compliant with the approximate version of Red Hat Enterprise Linux. This means that it is basically the same as RHEL, although there is no formal support.

Create the Virtual Machine

o Download CentOS-6.5-x86_64-bin-DVD1.is a CentOS mirror.
o Log into the vSphere Web Client. Navigate to Storage.
o Click “Upload a file to the Datastore”. Select the CentOS ISO image.
o Navigate to Virtual Machines. Right-click the Data Center and select “New Virtual Machine…” from the context menu.
o Leave the default “Create a new virtual machine” selected.
o Name the VM and select the folder to place it in. Then select the compute resource next Datastore then select the compatibility level. This is the virtual hardware version (ESX 5.5 is version 10).
o Select “Linux” for the Guest OS Family. Next Select “Red Hat Enterprise Linux 6 (64-bit)” for the Guest OS Version.
o Change New CD/DVD Drive to “Datastore ISO File” Select the CentOS ISO that you uploaded and click OK
o Click “Connect At Power On”.
o Next Confirm the Settings. Click Finish.
o Wait for the Virtual Machine to be provisioned.

Install CentOS

o Navigate to the newly created VM. Click the “Actions” drop down menu. Click on “Power On”, and then select “Open Console”.
o Click “Skip” -> Click Next.
o Select the Language for the Install. Click Next.
o Select the Keyboard type. Click Next.
o Keep the default “Basic Storage Device”. Click Next.
o Click “Yes Discard My Data”.
o Click “Configure Network”.
o Select “System eth0? And click Edit.
o Click “Connect Automatically”. Click the IPv4 tab. Then Click Apply.
o Click Close-> Click Next->Select the time zone-> Click Next.
o Set and Confirm the Root Password-> Click Next->Select Use All Space-> Click Next.
o Click “Write Changes to Disk”. Then Wait while the disk is created and formatted.
o Select the “Basic Server” package. Click Next.
o Wait for the Install to complete.
o Click Reboot to Finish the Installation.

Create a CentOS Template for vSphere ESX

o Open the vSphere Web Client and navigate to the CentOS Virtual Machine.
o Right Click the Machine and select All vCenter Actions > Convert to Template.


How to Change Windows Start Menu to Windows 7 Style

Thursday, May 1st, 2014

Tutorial:

To Change the Windows Start Menu to Windows 7 Style, do some tutorial as follows:

Windows 7 Start Orb Changer

Windows 7 Start Orb Loader is a free portable tool that allows you to change your Windows 7 start button without editing any system file.

o Run the tool as administrator.

o Check Enable Start Orb Loader.

o Click Browse and browse for the folder in which your start orb bitmaps are.

o Select your desired orb from the orb list.

o If you want to access the app directly from your desktop context menu, click Shell integration.

o Click Save Changes.

Now your start button will be changed. Just log off and log in to see the new orb.

Windows Tray Icons Creator is a free portable tool

That allows you to create tray icons with mouse click action in Windows. For example, create a tray icon and click it to open Registry Editor or your desired tool.

o Run the tool. It will now sit in the system tray:    Click its icon to open the Settings window.

o Select the icon for the first tray icon available.

o Type the Mouse Hover Tooltip text for the first tray icon available.

o Type the Mouse Click Action for the first tray icon available.

o If you want the tool to run every time Windows starts up then select run every time Windows Starts Up.

o Click Hide to send the tool back to the system tray.

How to Change the Display Language in Windows 7

If you live in an English-speaking country and purchased a PC at your local computer retailer or online, chances are you are running an English version of Windows 7.

However if your native language is something different than English and you prefer to use Windows 7 in your native language you do have the option of changing the display language of the operating system.

o Click the Start button to open the Start Menu.
o Enter “change display language” without the quotes, in the Windows search box.
o A list of search results will appear in the Start menu, click Change display language from the list.

Change the Default Power Button Action

o Click Start Menu tab of the ‘Taskbar and Start Menu Properties’ window.
o Drop up the Power button action to perform: Shut down, Switch user, Sleep, Log off, Lock or Restart.

o Choose the default action and click on OK.

Change the Number of Recent Items & Programs Shown

o To change how many recent programs and items are displayed in the Start Menu, go to the bottom of the ‘Customize Start Menu’ window and set the appropriate fields.
o Start Menu
o After change the values, click on OK.


How Important is Linking

Wednesday, April 30th, 2014

Basic description

A link is the usually underlined blue things you click on the interwebs. Linking to something is the act of implementing a link to something. This is accomplished using HTML and tags.

A link may be internal or external.

Internal links are links that go from one page on a domain to a different page on the same domain.

Code Sample

<a href=”http://www.same-domain.com/” title=”Keyword Text”>Keyword Text</a>


Use descriptive keywords in anchor text that give a sense of the topic or keywords the source page is trying to target.

They are commonly used in main navigation.

Some uses of internal links are as follows:

o They allow users to navigate a website.
o They help establish information hierarchy for the given website.
o They help spread link juice (ranking power) around websites.
o Internal linking is also important from a user perspective.

External Links are hyperlinks that point at (target) any domain other than the domain link exists on (source). If another website links to you, this is considered an external link to your site. Similarly, if you link out to another website, this is also considered an external link.

Code Sample

<a href=”http://www.external-domain-example.com/” title=”link anchor text”>Link Anchor Text</a>


Use descriptive keywords in anchor text that reflect the same topic or keywords the target page is trying to target.

An external link is a link that points at an external domain.

o Top SEOs believe that external links are the most important source of ranking power.
o External links pass “link juice” (ranking power) differently than internal links because the search engines consider them as third-party votes.
o Top SEOs don’t believe that the “title” link attribute is used for rankings purposes.

Some importance of linking is as follows:

o Getting “dofollow” links back to your website helps increase your site’s PageRank which helps it rank better in search results. When you rank better in search results, you get more traffic, generate more leads, and increase sales.
o If you find a web site that you or your visitors find valuable, then link to it and ask for a reciprocal link to your site.
o If your web site is useful and important to your visitors, search engines will honor that. A well-designed link directory can help you to make your site useful and important for your visitors.
o Search engines just try to organize the Internet. Links build it. If you participate in building the Internet with good links, your web site is in a good position.


FSMO Roles, Type, and Responsibility

Tuesday, April 29th, 2014

What is this?

FSMO stands for “Flexible Single Mater Operations”. The terminology FSMO was given in Windows 2000 by Microsoft, but in Windows 2003 it is called Operations Master, However the features and its functionality remain same in Windows 2003 and most people still call it FSMO.

Active Directory has five special roles which are vital for the smooth running of AD as a multi master system. Some functions of AD require there is an authoritative master to which all Domain Controllers can refer to. These roles are installed automatically and there is normally very little reason to move them, however if you de-commission a DC and DCPROMO fails to run correctly or have a catastrophic failure of a DC you will need to know about these roles to recover or transfer them to another DC.

The FSMO Roles:

FSMO role is divided into two categories:

Forest Wide Role

Domain Wide Role

Forest Wide Role is further divided into two categories:

– Schema Master

The schema is shared between every Tree and Domain in a forest and must be consistent between all objects. The schema master controls all updates and modifications to the schema. To make such updates / modification to the schema of a forest, an access has been established with the schema master.


– Domain Naming Master

When a new Domain is added to a forest the name must be unique within the forest. The Domain naming master must be available when adding or removing a Domain in a forest.  This is responsible to keep the records of all the Names in the network, which includes Domain names, users, printers and other objects in the Domain. It is used to get the information of the names in the forest.

Domain Wide Role is further divided into three categories:

– Relative ID (RID) Master

Allocate RIDs to DCs within a Domain. When an object such as a user, group or computer is created in AD it is given a SID. The SID consists of a Domain SID (which is the same for all SIDs created in the domain) and a RID which is unique to the Domain. When moving objects between domains you must start the move on the DC which is the RID master of the domain that currently holds the object.

– Infrastructural Master

The infrastructure master is responsible for updating references from objects in its domain to objects in other domains. The global catalogue is used to compare data as it receives regular updates for all objects in all domains. Any change to user-group references are updated by the infrastructure master. For example if you rename or move a group member and the member is in a different domain from the group the group will temporarily appear not to contain that member.

– PDC (Primary Domain Controller ) Emulator

The PDC emulator acts as a Windows NT PDC for backwards compatibility, it can process updates to a BDC. It is also responsible for time synchronizing within a domain. It is also the password master for a domain. Any password change is replicated to the PDC emulator as soon as is practical. If a logon request fails due to a bad password the logon request is passed to the PDC emulator to check the password before rejecting the login request.

Backward Compatibility: When in NT scenario Active Directory is introduced we will face the following issue: In NT there is a PDC (Primary Domain Controller) and the other entire server is BDC (Backup Domain Controller).

Time synchronization: This is responsible to keep a track on time settings of the entire server and other client machines in the network.

Password changes are updated on PDC Emulator: When there is a password change made in any of the machines it is first replicated to PDC Emulator which then reflects to other ADC as per scheduled.

Unless there is only one DC in a domain the Infrastructure role should not be on the DC that is hosting the global catalogue. If they are on the same server the infrastructure master will not function, it will never find data that is out of date and so will never replicate changes to other DCs in a domain. If all DCs in a domain also host a global catalogue then it does not matter which DC has the infrastructure master role as all DCs will be up to date due to the global catalogue.

Failed to Read PXE Settings. The System Cannot Find the File Specified: Error 80070002

Monday, April 28th, 2014

What is that error?

If we have to try to PXE boot a computer to deploy operating system through SCCM but it throw the error:

PXE-T01: File not found

PEX-E3B: TFTP Error – File not found


While investigating that, we find that smspxe.log shows this error:


“Failed to read PXE settings. The system cannot find the file specified. (Error: 80070002; Source: Windows)”

The above error comes when boot images and related files are not ready [i.e. The PXE Boot Image cannot be started] on SCCM server or Windows Deployment Service is not running on PXE service point role.

Initially, here are the some basic things to look into for PXE boot:

1. Unknown support should be enabled in SCCM PXe point Role

2. Unknown computer support in WDS server should be checked and check the DHCP authorization in Advanced tab.

3. If WDS and DHCP server are not in same server then port 60,67 should be configured in DHCP

4. Boot images(X86 and X64) should be distributed to Standard DP and PXE DP

5. At least one Task Sequence should be advertised to All Unknown computers.

Tutorial to fix it:

Windows Deployment Service is stopped. Before to manually run Windows Deployment Service, the following folder and all sub-folders have to be deleted:

1. Go to the folder “C:\Windows\Temp\PXEBootFiles” and delete all contents inside of that.

2. If that doesn’t help delete the boot images and re-create them.

3. In this, please remove Windows Deployment Service.

4. Then reinstall both the PXE service point and Windows Deployment Service

Failed to Populate ServiceStartUp Entries in Cache: Error 0x80070002

Sunday, April 27th, 2014

What is that error?

Configure the new Windows Server 2003 R2 machine to use our internal Windows Software Update Services (WSUS) 3.0 box as a local repository for Microsoft patches and updates.  The server didn’t appear in the WSUS console, so checked out the C:\Windows\WindowsUpdate.log file on the new server and found the following error:

EEHndlr WARNING: Failed to populate ServiceStartup entries in Cache: error 0×8007000

How it can be fixed:

Cause of this problem when the Windows Update service starts up, we look to see whether there’s a registry key named HKEY_LOCAL_MACHINE\Software\Microsoft\Windows\CurrentVersion\
WindowsUpdate\Setup\ServiceStartup.

And able to fix this error, which appeared to be caused by a corrupted Windows Update Client, by doing the following:

1. Download the most recent version of the Windows Update Client.

You can find the links to the appropriate version in the wuredist.cab file available from Microsoft.  Extract the file and you will have a wuredist.xml file that has links to the current (version 7.0.6000.381 as of 2008-05-29) x86, x64, and ia64 Itanium clients.

2. Run a command prompt, and change to the directory where you downloaded the client

3. From the command prompt run

WindowsUpdateAgent30-xx.exe /wuforce /norestart

Where WindowsUpdateAgent30-xx.exe is the name of the client you downloaded.

4. Force the newly installed Windows Update Client to synchronize with the WSUS server by running

wuauclt /detectnow

5. We will get a new %windir%\windowsupdate.log file.