<< back to sysax.com Product page

6.6.4. Creating Sysax user accounts

Sysax server specific user accounts can be created to enable account management directly through the Sysax server administration panel or through the web based administration interface.

Figure 6.18. User Account selection with Sysax user account option

User Account selection with Sysax user account option


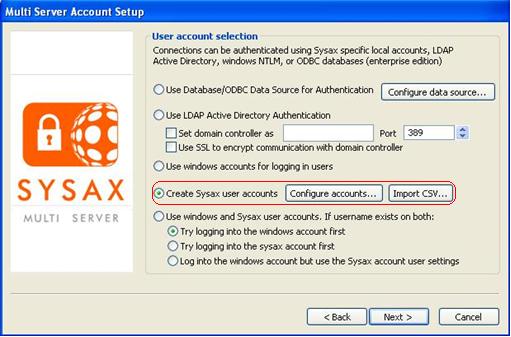
Clicking on the Configure accounts button opens the Sysax account manager window where user accounts can be created, deleted, or modified.

Figure 6.19. System User account manager

System User account manager


6.6.4.1. Adding User Accounts

The Add User account screen, enables you create user accounts. A user account can be created by specifying the username, password and home path. In the Add user account screen Login field is used to enter the user's login name and the Password field is used to enter the user's password. The Home path field is used to enter the home path of the user's computer. You can also click Browse to quickly identify and select the home path. Finally click OK to create the new user account.

Figure 6.20. Add user account

Add user account


6.6.4.2. Deleting User Accounts

When you choose to delete a user account, you are prompted by the Account delete confirmation screen.

Figure 6.21. Account Delete Confirmation

Account Delete Confirmation


This prevents you from inadvertently deleting an account. To verify the deletion, click Yes.


6.6.4.3. Granting User Permissions

After you create the user accounts, the next step is to grant specific access permission for each account.

Figure 6.22. Setting Permissions

Setting Permissions


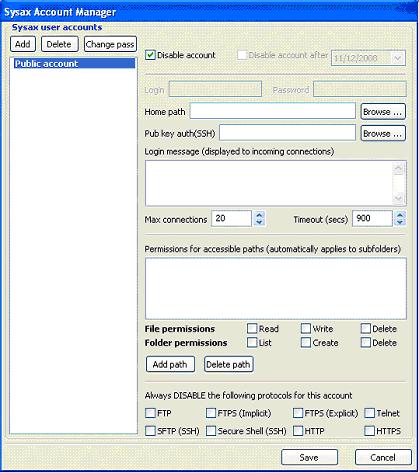
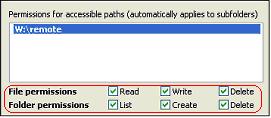
For each account listed in the field under Permissions for accessible paths, check the appropriate file permissions(read/write/delete) and folder permissions(list/create/delete).

You can also use the Add path and Delete path buttons to add or delete the highlighted paths.


6.6.4.4. Selecting Server Protocols

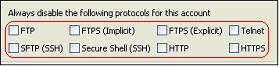
After granting the account permissions, the next step is to disable specific protocols for each account. To disable the specific protocols, check the appropriate protocols in this field.

Figure 6.23. Selecting User protocols

Selecting User protocols


6.6.4.5. Set Maximum Connections

The below figure represents the screen that enables you to set the maximum number of connections allowed to connect to the FTP server. It also allows you to set a timeout period.

Figure 6.24. Maximum Connections and Timeout

Maximum Connections and Timeout


To set maximum connection and timeout period, enter the number in the field to the right of Max connections. You can also use the UP and Down arrows to select a number.


6.6.4.6. Set Timeout Period

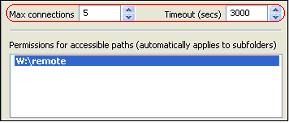
If the Sysax Multi Server does not respond or does not finish a response in a timely manner after the client sends a command, the server times out and disconnects.

To reset the timeout specification, enter the appropriate seconds in the field to the right of Timeout(secs). You can also use the Up and Down arrows to select a number.


Figure 6.25. Maximum Connections and Timeout

Maximum Connections and Timeout


Also, clicking on the Import CSV... button opens the Import CSV account file window where a CSV file containing comma separated account information can be directly imported into the server.

Figure 6.26. Import CSV Account File

Import CSV Account File


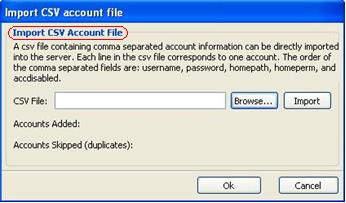
Each line in the CSV file corresponds to one account. The order of the comma separated fields are: username, password, homepath, homeperm and accdisabled. The example of CSV file is shown in below.
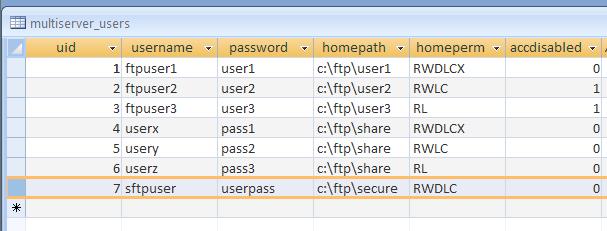
Figure 6.27. CSV File

CSV File


In this,

  • The username field is the username for the account and must be unique.
  • The password field is the password for the account.
  • The homepath field is the home path for the account.
  • The homeperm field shows the permissions for the home path and all sub folders.

For the permissions field,

R = file read

W = file write

D = file delete

L = folder list

C = folder create

X = folder delete

The accdisabled field shows if the account is disabled. An account is disabled if this field is set to 1.